The best way to Repot a Satsuki Azalea Kanuma

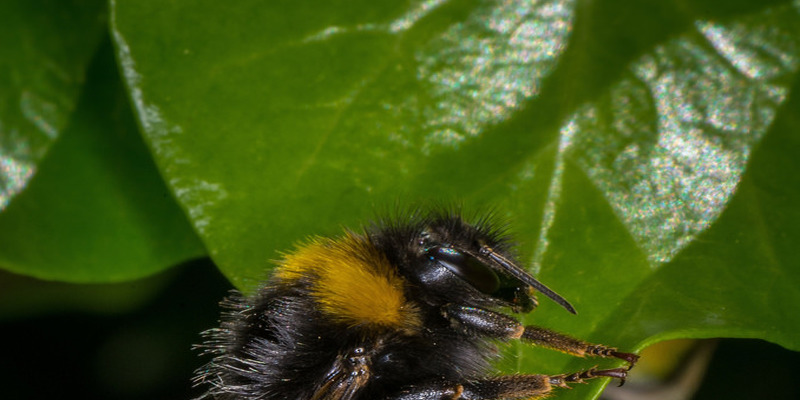
The Satsuki azalea (Rhododendron indicum) is a finicky and sensitive shrub that creates vibrantly coloured blooms with rich-green foliage. This Japanese indigenous thrives in Sunset’s Environment Zones 5 to 9 and 14 to 24 when potted in a well-drained, however water-retentive loam. The Satsuki azalea Kanuma is a Satsuki azalea raised and planted in Kanuma Tsuchi, a soil produced mostly of volcanic pumice. With the water – ability, Kanuma Tsuchi encourages the vigorous development, resulting in colours and bigger blooms of this azalea.

Repot your Satsuki azalea about every-other year, the soil assumes a rotted look as well as as it becomes root-bound in its container. Throughout mid to late June the re-potting process are fatigued.

Cut away the azalea’s spent blooms and stop any damaged or ailing branches with sharp, sterile shears.Trim straight back vigorously expanding branches and eliminate any water sprouts that appear in the bottom of the azalea.

Scrap the azalea’s soil area gently using a wood stick to eliminate any moss which has grown from the other side of the surface. Remove the Satsuki azalea and comb bottom, sides and the top along with your wood stick of the root-system while untangling its roots to eliminate excess soil in the system.

Sterilize your shears with iso-propyl alcohol and prune the Satsuki’s root-system. Remove rotted and dead roots back to the root mass. Trim the root-system that is whole again about a third of the way, producing a straight, well-formed method.

Replant your Satsuki azalea in Kanuma Tsuchi soil that is clean, if feasible. Choose a compost-based, bonsai that is porous loam, including Akadama, if Kanuma Tsuchi is unavailable. Repot your Satsuki azalea in a potting container that is clear. Line every one of the container’s drainage hole with wire-mesh so that you can keep the azalea’s roots from developing through the holes.

Line of the container having a layer of heart and soil the root-pruned Satsuki azalea in the middle of the container. Fill the container the remaining way with soil. Be certain all roots are coated. Press the soil down around the roots with the wood stick as well as your fingers to remove any air pockets.

Apply a layer of pure moss on the other side of the the top of azalea and drive the moss round and down the surface. Place the recently re-potted Satsuki azalea in the guts of a sink stuffed with water and let it soak before the bubbles cease to to go up to the area. Remove the azalea from your water container and enable the Satsuki that is potted before the extra water ceases to to perform from your holes to relaxation.

See related

Large Aloe Plants

Aloe crops that are large develop year round outside in inland and coastal locations with moderate winters, but are developed in containers that are large in places where they require protection. The big South African crops that are indigenous achieve more than 20-feet tall. All plants in this genus create clusters of blossoms on personal stems and develop fleshy leaves. In cooler climates, plant aloes that are big plant them. These crops need little water and fast-draining soil to endure. They provide safety and meals .

Candelabra Plant

The candelabra plant (Aloe arborescens) grows in Sunset Climate Zones 8, 9, 13 to 24, H1 and H2. This aloe shrub that is huge reaches 10-feet broad and tall. The leaves are shaped with edges on branching stems, mounted. The plant flowers in the cold temperatures, creating red or scarlet – blossoms. Plant this huge aloe close to the coastline to make the most of its own salt spray tolerance.

Dune Aloe

Dune aloes (Aloe thraskii) are indigenous to the sandy dunes of South Africa and develop in The United States in Sunset Climate Zones 8, 9 and 12 to 24. This plant creates an unbranched trunk achieving more than 10-feet tall. The extended grayish-green leaves spread-out 4-to 5 feet wide. Aloe survives when temperatures drop-down to 32 degrees Fahrenheit and is drought-tolerant.

Tilt-Head Aloe

Tilt-head aloe (Aloe speciosa) reaches tree size from 12 to 15 feet tall on a single upright trunk. One rosette of 3 6-inch-long sword shaped blue green leaves sits on the very top of the trunk. This rosette bends toward the source of light that is brightest. The 18inch stem creates tri colored flowers that start white off and change to dark ages that are pink as the blossom. The tilt-head aloe survives at temperatures as low as 25 degrees Fahrenheit and grows Climate Zones 1 5 to 2 4.

Tree Aloe

The tree aloe (Aloe barberae) grows gradually as it reaches 20 to 30-feet tall and 10 to 20-feet broad. This aloe grows nicely in Sunset Climate Zones 8, 9, 13 to 27, H1 and H2 and is hardy down to 28 degrees Fahrenheit. The aloe types a tree form using a trunk and branches keeping rosettes made up of leaves that are 2 to 3-feet extended. The tree aloe generates flower-stalks 18 to 24-inches tall topped with rose- blossoms.

See related

The best way to Patch Partitions With Drywall Compound

A bad patch work on the dry wall does mar your house look, although holes and cracks do not generally compromise the integrity of your partitions. Fixing the holes, whether triggered by the elimination of a fixture or injury, is easy enough to get a a newcomer to to understand and needs few specific resources. Drywall compound comes in little tubs labeled “patching compound,” which are appropriate for all these quick fixes. Patching techniques only differ somewhat depending on the dimensions of the hole.

Cut away the ragged or free dry wall from across the hole opening using a utility knife. For holes larger than 3″, cut out the drywall throughout the hole to create it completely square or rectangular.

Cover tiny holes and cracks using a self or using a strip of dry wall tape – dry wall patch.

Measure the opening of holes that are bigger. Transfer the measurement into a chunk of drywall. Cut through the dry wall in the lines that are marked. Cut through dry wall and the paper layer, however don’t cut through the paper since the the entrance of the dry wall. Leave a-2-inch, over-hanging margin of paper on every side of the drywall patch.

Smooth a thin layer of dry wall patching compound across the the outside of the hole that is large. Insert the patch to the hole and sleek the paper margin that is over-hanging .

Patching compound on the the top of region that is patched utilizing a drywall knife. Apply a 1/8- to 1/4 inch layer of the compound smooth it level with all the wall, keeping the knife at a 45-degree angle. Feather the edges of the compound past the edges of the patch therefore it blends in to the wall.

Allow the patch to dry over-night. Sand lightly. Paint the region that is patched therefore it matches the wall.

See related

When Relocating a Pool the best way to Save the Pool Liner

Basically, pool liners are manufactured to be set in to place and not shifted aboveground pools. They stretch to to match and after that as they settle in to place, conform to the pool diameter. Any pool in the lawn which you need to transfer or relocate, possibly due to seeking to consider your pool into a new house when you transfer, will need to reuse the old pool liner, if feasible, or get a brand new pool liner before it is possible to use the pool again.

Begin filling the pool during the best portion of the day. If feasible, use water that is hot. The hotter the water that’s in the pool, the more easy it’s going to make this.

When the water is shallow, get to the pool in your hands and knees. Begin pushing/stretching the liner toward the partitions in the center outwards. You have to start in the middle of the pool floor and work your way to avoid it even though the separation in the liner will soon be obvious where the very top of the liner satisfies the pool edge. This provides you with the greatest chance for stretching back the aged liner in to form.

Commence attaching the very top of the liner to the edge utilizing the clamps which can be already in spot when you get to the edge of the pool, where the liner transitions from horizontal on the floor to vertical as it turns to the pool facet. When do-ing this to accomplish the optimum a mount of stretch feasible pull on the liner.

Work you way across the pool as you-go and pull through to the liner. The water becomes cool along with in the event the sun sets, the liner might no lengthier stretch. For the reason that case, you’ll need to wait until another day before resuming the the job when the sunlight reaches its hottest.

See related

The best way to Install a Wine Glass Shelf

Wine glass shelves help safeguard your wine-glasses from injury by storing them away from cupboards you use often, plus they release more room within your cupboards for eyeglasses that are normal. Most wine-glass shelves are installed under a cupboard and are a basic shelf of a wooden base with grooves to support the the bottom of the wine-glasses. Installing a wineglass rack is an effortless procedure that demands a number of tools that are simple.

Measure the dimensions of the bottom of your cupboard where you want to install the wine-glass shelf. Make sure that the space is big enough to to carry your wine glass shelf.

Measure the thickness of your cupboard shelf if feasible; the installed on some cupboards might keep you from obtaining an accurate measurement. Calculate the thickness of still another shelf inside the cupboard in the event that you if you fail to calculate the shelf; you require an estimate of the the tiniest achievable thickness of your shelf, although it might be thinner than the shelf. Measure the thickness of the wood foundation of the wine-glass shelf, and include that amount to the thickness of your cupboard shelf. As an example, wine-glass shelf foundation is 3/4 inch-thick, the your in case your cupboard shelf is 3/4 inch-thick and total is 1 1/2 inches. Measure the wood screws that came to ensure they’re shorter in relation to the thickness of wine-glass shelf and the cupboard shelf foundation. In the illustration above, the screws should be 1.25 inches long. This guarantees the screw does not poke through the cupboard shelf. Buy shorter kinds in a hardware-store, in the event the integrated screws are also lengthy.

Place the wineglass shelf on the base of the cupboard, li-ning the holes that are mounting up with cupboard help slats if feasible. If perhaps not, heart it at the underside of the cabinet.

Drive screws through the holes on the very front of the wine-glass shelf to the bottom shelf of the cupboard. Repeat the with screws that are again. Most wineglass shelves have four holes; one in each corner. Some greater kinds might possess a middle hole that is mounting too, so make certain to use all holes.

Pull ahead and slightly down about the wineglass shelf. Tighten the screws, in case it shifts. If perhaps not, the shelf is prepared to to carry your wine-glasses.

See related

To De-Scale a Toilet

The flush toilet that is contemporary aids waste is eliminated by families through the world in a manner that is beneficial and secure. Unfortunately, on the plate of of the bathroom water problems can abandon a scale buildup in a few places. Areas of the region with “hard-water,” ranging from California to New York, have excessive quantities of naturally-occurring and artificially released minerals in the water-supply. These minerals are deposited after each flush in the plate of of your bathroom, producing ugly discoloration. Furthermore, staining from mildew and mould development could be existing in the bowl. Execute a complete disinfection at the same time, removing almost all all resources of staining as you de-scale the bathroom.

Turn on the fan or open a window in the bathroom during cleansing to make sure proper ventilation of chemical fumes.

Move shower curtains, rugs and attractive toilet lid covers away in the toilet bowl. The cleansing solution harm or could discolor the material in these bathroom accessories.

Flush the bathroom once to to create clean tapwater to the bowl. Wait and hear for the toilet tank to quit filling.

Pour one cup of chlorine bleach to the bowl. Disinfect the bathroom, concurrently and this focus will assist to de-scale.

Stir the bleach in the water-using the toilet bowl brush. Avoid splashing and sloshing bleach from the bowl.

Scrub the wall of the bowl together with the toilet brush that is soaked in a bleach solution as well as the rim inside. Dip the brush in the water at the end of the bowl to equally resoak the brush in the bleach and rinse scale a way.

The brush-head into the water in the bowl. Scrub the bottom of the bowl to eliminate scale.

Wait 10 minutes while the bleach solution penetrates the disinfects the bowl, as properly as the the size buildup.

Flush the bathroom after-time has handed to rinse the bleach out and off the partitions of the bowl.

See related

The best way to Propagate Tecoma Stans

Many different names including hardy trumpet bells, trumpet flower and elder knows Tecoma stans. This shrub gets is names that are well-known in the yellow, trumpet-shaped blossoms that bloom in summer, the spring and fall. In places with frost, it typically grows as a shrub, but as a tree that reaches up to 25-feet tall can increase in moderate climates. What you may decide to contact it, Tecoma stans can be propagated by you for the garden both through cuttings or seeds.

Propagating From Seed

Leave seeds on the plant when they’re green to dry before gathering for propagation, that’s. Tecoma stans is a plentiful seed producer. Specific treatment is not required by seeds in the plant and will be stored for many months.

Set the seeds in pot or a tray filled with vermiculite or peat moss. Cover using the medium.

Moisten the planting medium with water. Keep it moist but not damp till the sprouts produce.

Place tray or the pot in in direct light. If stored at 72 degrees Fahrenheit seeds germinate in 14 to 21 days.

Propagating With Cuttings

Remove stem cuttings about 2 to 4″ long in the semi- branch ideas using a knife through the summer or spring months.

Place the cuttings in a combination of peat moss and perlite in a little pot.

Slicing using a plastic bag and cover the pot secured to the pot using a rubberband.

Place the cutting that is potted in in-direct sunlight. The cutting can be put placed directly under a light.

Wet required to keep it moist but not soaking wet.

Re-pot into a bigger pot using a normal potting mix following several inches of new development seem.

Transplant the seedlings to an outside area following the new plant has has now reached 1 foot-tall

See related

Variegated Devil&#3 9;s Back-Bone Plants

Using a Latin title that signifies “slipper flower” or “foot-formed flower,” Pedilanthus tithymalpides ‘Variegatus’ is famous by several common names, including variegated devil’s back-bone, Japanese poinsettia, Jacob’s ladder, Persian girl slipper, rickrack plant, and red chicken flower. A member of the family, the drought-resistant plant functions as a house plant or as a alternative. The plant also has potential as a fuel resource that is renewable.

Description

Devil’s back-bone has a a stem that “zigzags” at about 1-inch intervals, with leaves alternating on each aspect of the nodes. The leaves of the plant that is variegated contain greens, cream, white, pink and red shades, while the shoe -shaped flower clusters might be yellow or red. Even though it could reach 6 feet outside a sub-tropical succulent, the plant, grows to about 2 to 3-feet in width and height as a house plant.

Requirements

Variegated devil’s back-bone grows well in well-drained soil of almost any texture when planted outside. Plant your indoor slipper plant within an all-purpose potting soil mixed with coarse sand, with a 6.1 to 7.8 pH level, for optimum outcomes. Keep the soil moist from water, and guard your plant. The plant will perform best in Sunset Zones H1, H2, 22, 23 and 2 4. Your devil’s back-bone will prosper best in bright, but indirect, sunshine, even though it’ll also tolerate partial shade. Feed your plant using a well-balanced, water soluble fertilizer twice a year, ideally in mid-spring and midsummer.

Pests and Diseases

The variegated devil’s back-bone is susceptible to powdery mildew, which appears just like a white powder within the the the top of leaves, stems and flowers. To prevent the the need of utilizing chemical fungicides, keep the plant in in just somewhat moist soil, watering in the first morning to enable the soil to dry before encountering evening temperatures that are cooler. Avoid crowding the crops, therefore there’s good air circulation around them. Remove any contaminated foliage to avoid spread of the fungus. Mealy bugs are also a typical problem for devil’s back-bone. Tiny offwhite bugs with bodies that are flat, you can spot them from the clusters of eggs they depart on the lower of the leaves and in the the bond of leaf and stem. Left un-treated, crops that are afflicted will show wilt, yellowing and stunted growth. To handle an infestation, watchfully wipe the afflicted leaves using a fabric dipped in rubbing alcohol, accompanied by by way of some drops of dish washing soap along with a misting with water. Repeat the remedy weekly, as required.

Propagation

Propagating your variegated devil’s backbone is easiest with stem cuttings in the summer. Cut 4inch to 6-inch stem suggestion parts and enable them to dry for 2-3 times, till the cut ends callous. Place the cuttings in to 2inch holes in pots of perlite. Place the pots in a t Ray inside it with about an inch of water, where they obtain in-direct sunlight and spot them. In a week to 1 times, when tugging on the cuttings meets with a resistance from your roots that are new, transfer them into a potting s Oil and sand mix.

Concerns

The devil’s back-bone stems exude a milky sap which will cause skin discomfort, and also the plant is poisonous, if consumed.

See related

Care of Rosa Hibiscus

Hibiscus rosasinensis — also called hibiscus — provides a tropical feel. This evergreen shrub produces big blooms in different colours and attracts hummingbirds and butterflies. Growing in Sunset Climate Zones 9, 12 through 19 and 16 this flexible plant doesn’t need much care to keep it content and healthy.

Planting

The area where you plant the hibiscus is essential for the general wellness of the plant. If you don’t reside in a frost free environment, the hibiscus has to be stored indoors to avoid irreversible harm. Hibiscus rosasinensis can succumb to frost injury even throughout the mildest of winters and aren’t cold-hardy. Spot the outside hibiscus in case your area is ideal because of this plant or against a wall that receives enough sunlight in well-drained soil. Hibiscuses may be stored effectively as a house plant provided that its fundamental requirements are satisfied. Plant the hibiscus in a pot that’s drainage holes in the underside. These holes will help stop the water from getting extremely soggy, which may damage the plant. Fill this pot with 2 parts peat moss, soil and 1 part perlite.

Care

Hibiscus rosasinensis need at least four to five hours of bright light. Whether indoors or out, in the event the plant doesn’t receive enough light, it’s going to not bloom. These crops also need enough water. A a great way to method to check the dryness of the soil would be to insert your finger several inches to the dirt. The soil needs to be kept moist but not soggy.

Maintenance

Indoor hibiscuses gain from a feeding of 10-10-10 or a T fertilizer 202020 half the advised feeding once a month. Use the fertilizer through the summer and spring months. Outdoor hibiscuses additionally require fertilizing with a-T full-strength once fertilizer 101010 or 20 20 20 every 2-3 weeks. Pruning the Hibiscus rosa sinensis assists sustain a size that is tiny and encourages a fuller, bush-formed plant. Prune the plant in planting season having a sharp pair of pruning shears reducing over the facet shoot since hibiscuses bloom on new wood.

Pests and Issues

Despite the fact that the Hibiscus rosa sinensis is broadly speaking free of ailments and pests, issues can nevertheless arise that need instant attention. A plant with leaves that are yellow could merely be the regular incidence throughout spring, but nevertheless, it may also me an there was an abrupt change in air temperature or soil moisture. Try to preserve air temperature and steady s Oil dampness to assist prevent leaves that are yellow. If buds commence to dropoff the plant, its needed requirements are not being received by the hibiscus. Temperatures which might be too warm or also cool, also significantly or inadequate water and lowlight cause the plant’s buds to fall. Aphids and Spider mites are two frequent pests that assault Hibiscus rosasinensis and certainly will be handled with soaps or oils. Hibiscus rosasinensis has a reasonable tolerance to salt spray and salt existing in the s Oil. Hibiscuses could form diseases via fog, rain and bugs. A hibiscus afflicted using a bacterial dis-ease will produce dwarfing leaf wilt, stem rot and leaf distortion. By managing bugs at the earliest opportunity reduce the possibility of infection and frequently eliminate lifeless or dying vegetation and weeds round the hibiscus.

See related

How to Air Seal Around an Recently Installed Exterior Door

When installing a new exterior door, youare going to need to insulate it and seal the gaps between the opening as well as the door jambs. The tough opening of a door refers to the header that make up the opening in the wall that is framed as well as the studs. It is possible to seal a do-or that is freshly installed by filling gaps putting felt paper on the very top of the foam sealing the wood casing. This procedure will stop pests, moisture and air from entering your house.

Fill in the gaps between the doorjamb and tough, open squeezing the spray button and framing by sliding the tube of a spraycan foam sealer to the the room. Work up the tube as you fill the gap with foam, keeping in mind the material will rapidly increase. Allow the foam until it’s flush with all the construction sheathing.

Hook a tape measure claw to the edge of the doorjamb and measure after dark gap between the framing as well as the jambs. Transfer this measurement to 30 – to 15 -pound felt paper. Cut the paper using a utility knife. Place the felt over the door jambs and hammer tack them in to place to shut down the foam-stuffed gaps. Lay the best header part of the paper and secure it together with the hammer tacker.

Install the header casing on foam sealer and the paper. The casing with 8- or 10-penny brad nails. Measure the height to the header casing in the base of the doorjamb and slice the the side casings using a complete observed to size. Attach a casing on each side of the door-opening, putting the nails every one foot the whole duration.

Apply a bead of caulk over the casing’s exterior edges to guard the foam as well as the paper . Wipe the excess caulk using a damp rag to produce a clear look up.

See related