Kitchen Renovation: DIY Projects Versus Hiring Professionals
Sarah and Luke purchased a cozy bungalow with a kitchen featuring outdated cabinets, flickering lights, and worn laminate counters. They initially planned to handle the renovation themselves, inspired by online tutorials. However, after installing one uneven row of tiles, they recognized that certain tasks require professional expertise. Homeowners often face this dilemma: determine when to proceed with do-it-yourself efforts and when to engage specialists.
This guide explores the equilibrium between personal initiative and professional skill. Readers will gain insights to select approaches aligned with their abilities, financial resources, and schedule.
Initial State: A Functional Yet Fatigued Kitchen
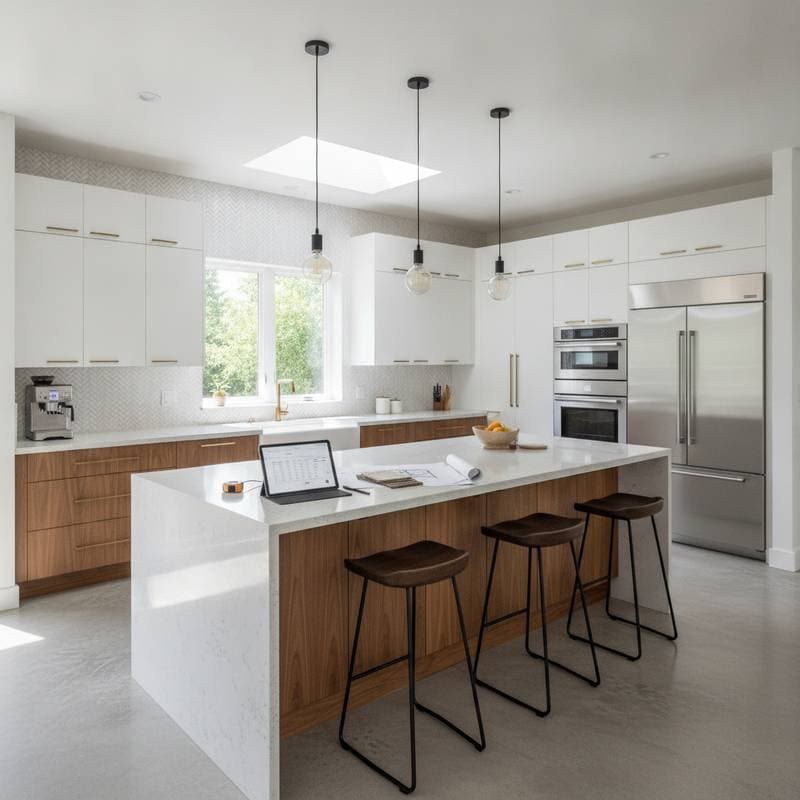
Prior to the renovation, Sarah and Luke's kitchen operated adequately but appeared weary. Yellowed cabinets bore the marks of prolonged exposure to cooking vapors. The arrangement compelled cooks to maneuver awkwardly between the refrigerator, sink, and stove within a confined area. Dim illumination made the room seem even smaller, while drawers jammed and surfaces retained traces of prior use.
The couple envisioned a brighter, more efficient environment. They desired a setting where preparing morning coffee became an enjoyable routine rather than a hurried task. Their goals included incorporating wooden elements for warmth, achieving modern simplicity, and selecting resilient surfaces suitable for everyday demands.
Projects Suitable for Do-It-Yourself Efforts
Undertaking do-it-yourself projects allows homeowners to reduce costs, gain assurance, and infuse personal style into the kitchen. Success depends on recognizing personal boundaries. Ideal tasks suit individuals equipped with basic tools, patience, and a willingness to learn.
1. Painting Cabinets and Walls
Applying fresh paint ranks among the most cost-effective transformations for a kitchen. Preparation proves essential: sand surfaces thoroughly, apply primer evenly, and select a durable enamel paint resistant to grease and smudges. Allow adequate drying time between coats, typically 24 hours, to ensure longevity.
2. Updating Hardware
Exchanging old handles or knobs requires only a drill and measuring tape. This minor adjustment yields significant visual improvement. Choose pieces that complement existing elements, such as faucets or lighting, to maintain harmony; measure screw hole distances precisely to avoid drilling new holes.
3. Installing a Backsplash
Homeowners adept with a tile cutter and attentive to alignment can successfully add a backsplash. Adhesive-backed tiles simplify the process for beginners. Select classic subway tiles in neutral shades for enduring style or patterned ceramics to introduce character; use spacers for uniform grout lines.
4. Adding Open Shelving or Floating Shelves
Floating shelves can substitute for cumbersome upper cabinets, enhancing visual openness. Anchor them securely into wall studs using a level for straight installation. Arrange items like mugs, bowls, and plants on the shelves to create an inviting display that reflects daily routines.
5. Replacing Basic Fixtures
Exchanging light fixtures or faucets often requires no professional intervention, provided power or water supplies are disconnected first. Verify all connections follow manufacturer instructions. If uncertainty arises, seek advice from a hardware store expert prior to starting.
Assessing Financial Realities
Do-it-yourself approaches do not guarantee savings, as errors may incur additional expenses for corrections. Allocate the budget across categories to maintain control:
- Essential services involving plumbing, electrical work, or structural changes: 40 to 50 percent.
- Cosmetic enhancements such as paint, hardware, and backsplash: 25 to 30 percent.
- Reserve for unforeseen issues: 15 to 20 percent.
This allocation provides adaptability while preserving quality standards.
Key Design Elements That Enhanced the Outcome
Effective kitchen renovations, regardless of execution method, rely on deliberate choices. The following features elevated Sarah and Luke's project:
- Neutral color foundation: Soft white walls paired with warm wood accents fostered a serene atmosphere.
- Matte black faucet: This element introduced contemporary contrast without dominating the design.
- Integrated storage solutions: Deep drawers supplanted inefficient corner units, improving accessibility.
- Layered lighting: Combinations of recessed, pendant, and under-cabinet options supported both ambiance and utility.
- Resilient surfaces: Quartz-resembling counters alongside sealed butcher block merged aesthetics with durability.
These selections prioritized both appearance and usability. Materials withstood regular contact without sacrificing appeal.
Experiencing the Renovated Space Daily
After completing the work and storing tools, the true evaluation occurs through everyday use. Superior kitchens enhance routines seamlessly. Drawers operate smoothly, lighting adjusts to various needs, and layouts facilitate interaction during meal preparation.
Sarah and Luke's updates extended beyond superficial changes; they reshaped daily habits. Sunlight now reflects off the backsplash to brighten mornings, eliminating shadows from former cabinets. Evenings unfold more efficiently with organized storage. Such transformations deliver subtle yet profound improvements.
Planning Your Renovation Strategy
Before selecting tools or contractors, visualize the desired kitchen atmosphere: inviting, efficient, or suited to family gatherings. Assess personal capabilities to identify self-managed tasks versus those needing experts. This preparation ensures a renovation that aligns with lifestyle goals and delivers lasting satisfaction.